Are you someone who had trouble drawing straight lines as a kid? Did you also fuss over the chaos of finding a ruler minutes before your assignments were due? Do you still feel that people who can draw straight lines with a free hand are prodigies? If you answer affirmatively to any of those questions, you are not alone.
We have all experienced a time where drawing straight lines sounded like a herculean task but drawing them was the only way forward. Be it on an assignment or while hanging a picture on the wall; the alignment was always a dealbreaker.
And thus, to provide aid with getting the alignment correct, various tools came into existence, Chalk lines being one of them.

What is a Chalk Line?
In common parlance, A chalk line is ideally a tool that leaves a line covered in chalk after its use so that the alignment can be put into place, but there is a little more catch with the whole assembly.
A chalk line is an adaptive tool that facilitates drawing straight lines on almost all possible terrains where a straight line is required. Some common uses of it are fixing timbers, giving your tiles a makeover, or even replacing a torn wallpaper. It is easy to use, comes at a very pocket-friendly price, and is also the proud recipient of every handyman’s choice.
How does it work?
The functioning of a chalk line is as simple as its name, and that is why it is said to be the easiest do it yourself (DIY) tool.
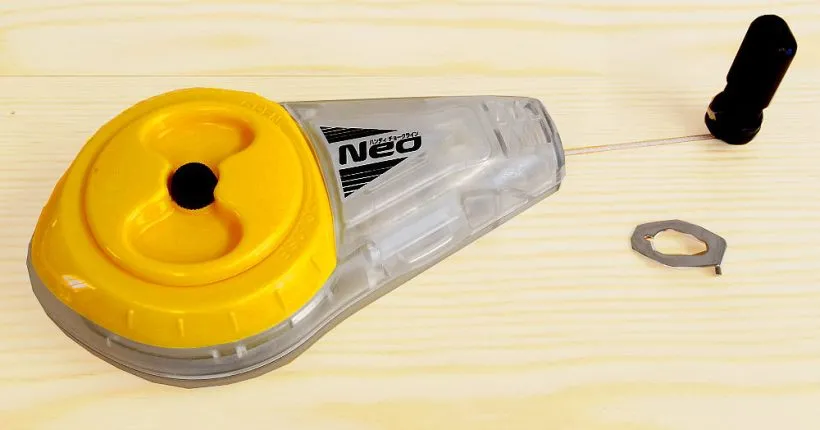
The box is essentially a container for the chalk, which has to be used for the impressions and is also the place where the string absorbs the chalk. There is a hook that is attached to one of the ends of the string so that it can be affixed to a nail or any fixed surface as the starting point of the measurement.
After the hook is affixed, the string is pulled out and is placed on the area where the impression is needed. The area which comes in contact with the chalk absorbed string gets marked and can be used further for alignments and measurements.

Is it that simple?
Yes! It is that easy to use a chalk line, but there are a few things that have to be kept in mind while using the chalk line correctly in order to fulfill the task in a single take.
Amount of Chalk in the Chalk Box
The first and the foremost error which almost everyone commits is filling the chalk box handsomely with more than the appropriate amount of chalk. It is a very common mistake which is committed in order to save an extra minute used for refilling the container.
When the chalk box is overfilled, the string shows resistance while drawing out and also while drawing back in. It is always suggested to refill it multiple times rather than filling it to the top to ensure better results and to avoid premature wear and tear.
Color of the Chalk
Another common mistake is to use any available color of the chalk for your markings rather than picking them up logically.
Red colored chalk is often used for trying conditions. It is the all-weather choice, which is preferred mostly in external locations.
White colored chalk is preferred in internal conditions when the chalk line is used for hanging a painting or while pasting wallpapers. It is better matched for internal conditions and is always easier to get rid of after usage.
Fluorescent colored chalk is the go to chalk for conditions where the lighting is not favorable, or the work has to be conducted during the night.
Snapping the String
Snapping the string after it has placed its first-hand impression is a very important practice while using a chalk line. To snap, the hook on the other end is attached to a nail (Attaching the hook to the nail also keeps the line straight, devoid of any deviations), and once the string is drawn out up to the desired length, it should be pulled up from between and then left to strike the ground. This process should be repeated a couple more times in order to get decent impressions.
Getting the surface clean
As mentioned earlier, the chalk line is a tool that is suited for almost all surfaces. The surface in use should be decently clean so that dust does not override the impressions of the chalk. This practice is the key to avoiding various takes for the same impression.
I love the chalk line, but do these marks wash off?
Yes, they do! It is a very legitimate concern for everyone who is trying their way around to use a chalk line because nobody wants permanent chalk stains. These chalk lines are prone to difficult conditions, but when they are scrubbed at will, they fade and get removed.
These chalks are semi-permanent, and this is why the ideal color to choose for internal work is white. The white-colored chalk is easier to get rid of as compared to its yellow-colored ally.
Final words
After reading this information, you are all set to take up the job of fixing some paintings or to help out with some misplaced tiles. The Chalk Line comes in a lot of varieties and can be found at almost all hardware stores. It is extremely convenient if there is very limited usage of such tools. The starting price of the most basic variant is approximately 5 dollars.
However, for better results, you should always go for a chalk line that has a fine thread. The fine thread uses less chalk, gives out better impressions, and is swift while drawing in and out.
So, what are you waiting for? Get yourself a great pizza for saving all the money that you otherwise have paid to a handyman!
Thank you for reading!