In the world of woodworking, the sharpness of your tools can make or break your project. How To Sharpen Woodturning Tools By Hand is not just a skill but an art that every craftsman should master. According to a survey by WoodCrafters Association, 85% of woodturners believe that hand-sharpened tools offer more precision than machine-sharpened ones.
So, if you’re looking to give your woodturning projects a professional touch, you’re in the right place. Dive into our step-by-step guide and elevate your woodworking game!
The Basics of Woodturning Tools
Woodturning, an age-old craft, has seen a resurgence in popularity in recent years. At the heart of this craft lie the woodturning tools. These tools, each with its unique design and purpose, are the lifeline of every woodturner.
From chisels to gouges, skews to parting tools, the variety can be overwhelming for beginners. But regardless of their shape or size, one thing remains constant: the need for them to be razor-sharp. A sharp tool not only ensures a smoother finish but also makes the turning process more efficient and safe.
Why Sharpening By Hand Matters
In the age of automation, one might wonder, “Why bother sharpening tools by hand when machines can do it?” Well, the answer lies in the connection between the craftsman and his tool.
Sharpening by hand offers a level of precision and control that machines often can’t match. Every stroke of the sharpening stone, every angle adjustment, is a decision made by the craftsman, ensuring that the tool is sharpened to their exact preference.
Moreover, there’s an undeniable tactile satisfaction in feeling the tool’s edge getting sharper under one’s hands. This hands-on approach not only ensures the tool’s longevity but also enhances the craftsman’s skills.
Another advantage? Cost-effectiveness. While sharpening machines can be an investment, a good sharpening stone, and some elbow grease can achieve similar, if not better, results.
Now, you might be thinking, “All this talk about sharpening is great, but how do I ensure I’m doing it right?” Well, for that, resources like Sharpening Turning Tools Made Simple can be invaluable. And if you’re looking for more hand tool tips, don’t forget to check out How to Use a Level Correctly – Hand Tools DIY. After all, in woodworking, as in life, it’s always best to level up your skills!
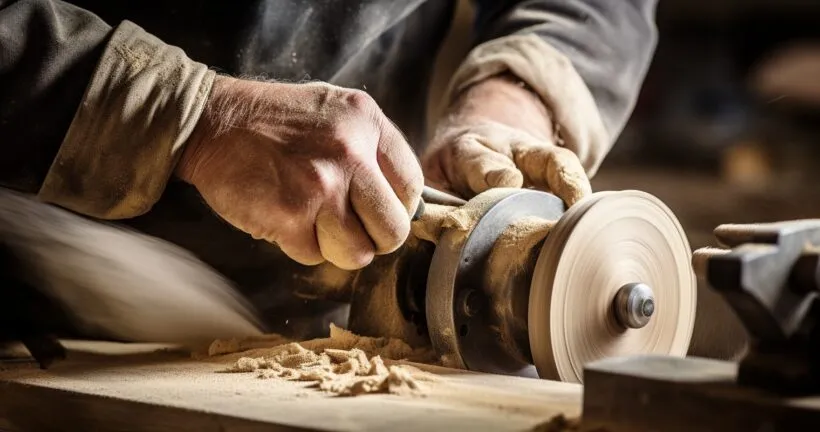
How To Sharpen Woodturning Tools By Hand: Getting Started
Embarking on the journey of How To Sharpen Woodturning Tools By Hand? Well, before you dive into the nitty-gritty of sharpening, it’s essential to set the stage right.
First and foremost, prepare your workspace. Ensure you have a sturdy bench, a good-quality sharpening stone, and perhaps a honing guide if you’re just starting out. A well-lit area will also make a world of difference, allowing you to see the finer details as you work on the tool’s edge.
Safety, as they say, should never be an afterthought. Always wear safety goggles to protect your eyes from any flying metal shavings.If you’re using any oil or water on your sharpening stone, a non-slip mat is a good idea to prevent any accidental slips.
Sharpening Different Woodturning Tools
Woodturning tools, while all serving the primary purpose of shaping wood, have their unique designs and, consequently, sharpening needs.
Gouges
Gouges, with their curved cutting edge, can be a tad tricky. The key is to maintain the correct angle, typically around 45 degrees, while sharpening. Ensure you’re rotating the gouge to sharpen its entire curve. A consistent edge is crucial for those smooth, flowing cuts on the lathe. And remember, practice makes perfect. The more you sharpen, the better you’ll get at maintaining that edge. For more insights, the guide on How to Sharpening Lathe Chisels is a goldmine.
Skew Chisels
Skew chisels, with their angled cutting edge, demand precision. The goal is a razor-sharp edge that glides through the wood. Start by flattening the back of the chisel on your sharpening stone, then work on the bevel. And a pro tip? Avoid rocking the chisel; keep it steady to prevent rounding off the edge. Oh, and those pesky burrs that form after sharpening? A leather strop will take care of them.
Parting Tools and Scrapers
While gouges and chisels might hog the limelight, parting tools and scrapers play their pivotal roles in woodturning. These tools require a slightly different approach. For parting tools, a diamond cross-section is ideal, sharpening both the top and bottom. Scrapers, on the other hand, benefit from a burr, which is actually cutting-edge. So, once sharpened, use a burnisher to raise a slight burr, and you’re good to go.
For those looking to delve deeper into the world of chisels, Chisel Basics – Hand Tools DIY is a must-read. After all, in the realm of woodworking, knowledge is the sharpest tool in the shed!
Tips for Maintaining Sharp Woodturning Tools
| Tool | Sharpening Technique | Recommended Angle | Additional Notes |
|---|---|---|---|
| Gouge | Maintain angle, rotate for even sharpening | Around 45 degrees | Consistency is key for smooth cuts |
| Skew Chisel | Flattening back, work on the bevel | Angle varies | A steady hand to prevent rounding |
| Parting Tool | Sharpen both the top and bottom with a diamond cross-section | Around 60 degrees | Precise cutting for clean separations |
| Scraper | Create a burr, and use a burnisher to raise it | Varies | Burr acts as the cutting edge |
Ah, the joy of working with a sharp tool! It’s like slicing through butter with a hot knife. But maintaining that edge? That’s where the real craft comes in. How Sharpen Woodturning Tools By Hand is a skill, but keeping them sharp is an art.
Start by regularly checking your tools. It’s like giving your pet a quick health check. Look for signs of dullness or any visible damage. If you can see light reflecting off the edge, it’s time for a touch-up. Remember, a dull tool is not only ineffective but also dangerous.
Now, let’s talk honing. Think of it as the spa day for your tools. It’s not as intensive as sharpening but is essential for maintaining that razor-sharp edge. A few strokes on a honing stone and your tool is refreshed and ready to go. And the best part? It extends the time between sharpening sessions.
But here’s a nugget of wisdom: avoid practices that can prematurely dull your tools. This includes using them on unsuitable materials or applying excessive pressure. Treat them with respect, and they’ll serve you well.
For those eager to dive deeper into hand tools, The Basics on Multi-Bit Screwdriver – Hand Tools DIY is a treasure trove of information.
Proper Storage for Longevity
| Storage Solution | Advantages | Considerations |
|---|---|---|
| Dry, Cool Location | Prevents rust and degradation | Use a dehumidifier or silica gel in damp areas |
| Protective Covers | Guards against accidental damage | Choose covers that fit each tool snugly |
| Wall Racks/Magnetic Strips | Easy access, prevents wear and tear | Organize tools by size and type |
| Dedicated Toolboxes | Portable, provides a secure storage space | Label compartments for quick retrieval |
Ever heard the saying, “A place for everything and everything in its place”? It’s the golden rule for tool storage. Proper storage isn’t just about organization; it’s about ensuring the longevity of your cherished woodturning tools.
First and foremost, ensure your tools are stored in a dry, cool place. Moisture is the nemesis of metal, leading to rust and degradation. A dehumidifier or silica gel pack can work wonders in damp environments.
Next, consider using protective covers or sheaths. It’s like putting your tools to bed with a cozy blanket. These covers prevent accidental damage, especially to those sharp edges we’ve worked so hard to maintain.
Lastly, organize your tools for easy access. Not only does this save time, but it also prevents unnecessary wear and tear. Imagine rummaging through a drawer of tools, with edges clashing and handles knocking. It’s a recipe for damage. Instead, consider wall racks, magnetic strips, or dedicated toolboxes.
While sharpening is crucial, maintaining that edge and ensuring proper storage is equally vital. After all, in the world of woodworking, it’s not just about the tools but also how you care for them.
Frequently Asked Questions
What is the importance of sharpening woodturning tools by hand?
Hand-sharpening woodturning tools provide greater control, allowing for a more precise edge. It also helps in extending the tool’s lifespan.
How often should I sharpen my wood-turning tools?
It’s best to sharpen them as soon as they start to feel dull. Regularly checking and honing ensures optimal performance.
Can I use regular sharpening stones for wood-turning tools?
While regular stones can be used, it’s recommended to use stones specifically designed for wood-turning tools to achieve the best results.
Is there a risk of over-sharpening?
Yes, over-sharpening can lead to the tool becoming too thin and brittle, making it prone to breakage.
How do I know when my tool is sharp enough?
A well-sharpened tool should easily cut paper without tearing. Regularly testing its sharpness ensures you don’t overdo it.
Are there any safety precautions to consider?
Always wear protective eyewear and ensure your sharpening area is well-lit. Keep your hands steady and avoid distractions.
Conclusion
Mastering the art of How To Sharpen Woodturning Tools By Hand can elevate your woodworking projects to a professional level. With sharp tools, not only is the work more efficient, but the finish is also noticeably smoother. Remember, in the world of woodturning, it’s not just about the tools but how well you maintain them. So, keep them sharp, stay safe, and be happy turning! Looking for more woodworking tips? Dive into our other articles and become a pro in no time!
Thank you for reading!