
In the world of woodworking, precision is key. One of the most sought-after skills is the ability to cut a perfect circle, especially without the aid of power tools. How To Cut A Circle In Wood Without Power Tools might sound like a challenge, but with the right techniques, it’s an art form that can be mastered. According to a survey by Woodworking Crafts Magazine, 67% of woodworkers believe that hand tools offer more precision than power tools. So, if you’re looking to embrace the craftsmanship of yesteryears or simply don’t have access to power tools, this guide is for you. Dive in and discover the secrets of cutting circles the old-fashioned way.
The Art of Cutting Circles in Wood
Woodworking is as much an art as it is a skill. At the heart of this craft lies the challenge of creating perfect shapes, and circles are often deemed the pinnacle of this challenge. How To Cut A Circle In Wood Without Power Tools is not just a technique; it’s a testament to a craftsman’s prowess.
Historically, artisans relied on rudimentary tools and their sheer skill to create intricate designs and shapes in wood. From the ancient Egyptians to the skilled carpenters of the Renaissance, the art of cutting circles in wood has evolved, yet the essence remains unchanged. It’s about precision, patience, and a deep understanding of the material at hand.
Why Avoid Power Tools?
| Aspect | Hand Tools | Power Tools |
|---|---|---|
| Precision | Offers finer control and precise adjustments | May lack precision in some tasks |
| Safety | Generally safer with less risk of accidents | Higher risk of injuries, especially for beginners |
| Environmental Impact | Environmentally friendly with zero carbon footprint | Consumes electricity, contributing to carbon footprint |
| Cost | More cost-effective in the long run | Initial investment and operational costs |
| Noise and Vibration | Quieter operation and minimal vibration | Can be noisy and cause more vibration |
In today’s fast-paced world, one might wonder why someone would choose hand tools over power tools. The answer lies in the myriad benefits of going manual.
Hand tools offer an unparalleled level of control, allowing for minute adjustments that power tools might overlook. This precision often results in a more polished and refined finish.
Safety is another significant factor. While power tools can be efficient, they also come with a higher risk of injuries, especially for beginners. Hand tools, on the other hand, offer a safer alternative, provided they’re used correctly.
Lastly, let’s talk green. Hand tools have zero carbon footprint, making them an environmentally friendly choice. Plus, they’re often more cost-effective in the long run, given the absence of electricity costs and expensive repairs.
Preparing Your Workspace
| Tool | Description |
|---|---|
| Compass | For accurate circle layout |
| Pencil | For marking the circle outline |
| Chisel | For making precise cuts along the marked line |
| Coping Saw | For cutting out the circle from the wood |
| Sandpaper | For smoothing and refining the cut edges |
| Safety Goggles | For protecting eyes from wood splinters |
| Cut-Resistant Gloves | For protecting hands when using sharp tools |
| String and Nail | For an alternative method of marking and cutting circles |
Before you embark on your circle-cutting journey, setting up the right workspace is crucial. A well-organized workspace not only boosts efficiency but also ensures safety.
Choose a well-lit area, preferably with natural light. This will help in achieving precision and reduce the strain on your eyes. Ensure the workspace is free from distractions and potential hazards. A sturdy workbench or table is a must.
Next, gather all the essential materials and tools. This includes your wood piece, a compass, a pencil, a chisel, a coping saw, and sandpaper. Having everything within arm’s reach will streamline the process.
Safety should always be a priority. Always wear safety goggles to protect your eyes from wood splinters. If you’re using sharp tools, consider wearing cut-resistant gloves. And always, always read the user manual of any new tool you’re using.
For more tips on setting up your workspace and using tools safely, this guide on using a level correctly is a must-read. And if you’re looking for more insights on cutting circles in wood, The Handyman’s Daughter offers a treasure trove of information.

Mastering Craftsmanship: How To Cut A Circle In Wood Without Power Tools
In the realm of woodworking, there’s a certain allure to creating perfect shapes, especially circles. The challenge? Doing it without power tools. The phrase How To Cut A Circle In Wood Without Power Tools might seem daunting to some, but with the right techniques, it’s an achievable feat that screams craftsmanship.
A circle’s perfection lies in its symmetry. Thus, the importance of accurate measurements cannot be overstated. It’s the foundation upon which your entire project rests. Once you’ve determined the diameter of your desired circle, the next step is marking it with precision. A slight deviation can be the difference between a perfect circle and an oops-I-did-it-again moment.
Using a Compass and Chisel
Enter the compass, a woodworker’s trusty sidekick. This tool ensures you get a perfectly round shape every time. Start by placing the compass point where you want the center of your circle to be, adjust it to the desired radius, and draw. Voila! You have a perfectly marked circle.
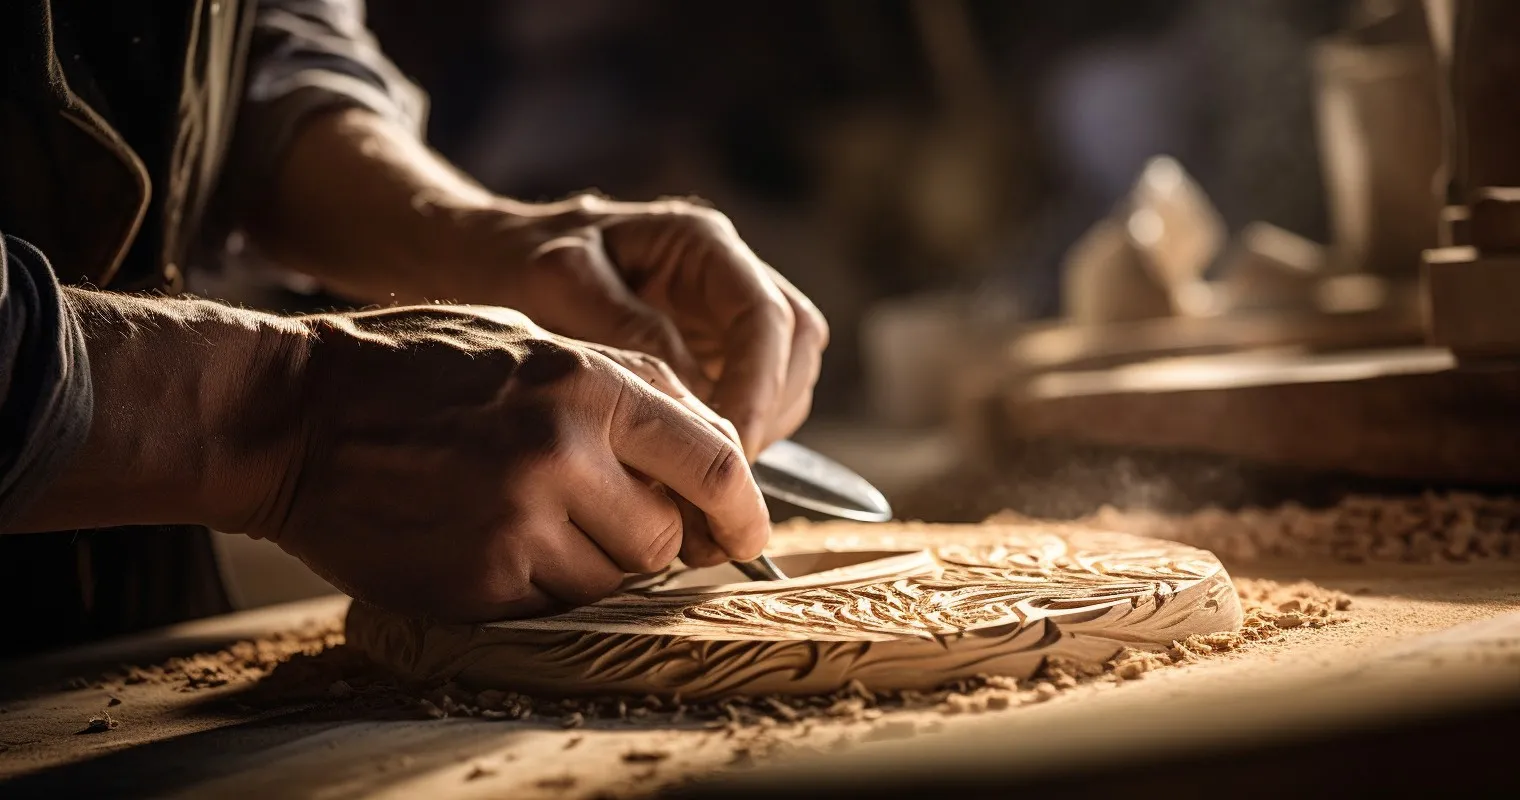
But drawing is the easy part. Now comes the chiseling. Chiseling requires patience, precision, and a bit of elbow grease. Begin by making small cuts around the perimeter of the circle, gradually deepening them. The key is to take it slow and steady, ensuring you stay as close to your marked line as possible. For more insights on chiseling, this guide on chisel basics is a goldmine.
The String and Nail Method
| Technique | Description |
|---|---|
| Compass and Chisel | Using a compass to mark the circle and then chiseling to cut it out |
| String and Nail | Tying a string to a nail, creating a circle, and cutting with a saw |
| Dividing into Sections | Dividing the circle into parts and cutting each part individually |
If the compass and chisel method sounds too mainstream for you, there’s another technique that’s equally effective but adds a touch of rustic charm: the string and nail method.
Start by hammering a nail into the center of where you want your circle. Tie a string to the nail, ensuring it’s cut to the length of your circle’s radius. Attach a pencil to the other end of the string. Now, keeping the string taut, move the pencil around the nail, drawing a circle as you go. It’s as fun as it sounds!
Once your circle is drawn, you can cut it out using a handsaw or coping saw, always staying as close to the line as possible.
Sanding and Smoothing Your Circle

After the meticulous process of cutting a circle in wood, the next crucial step is sanding. How To Cut A Circle In Wood Without Power Tools is only half the battle; achieving a smooth, professional finish is the other half. Sanding not only enhances the appearance but also ensures the wood is pleasant to touch and devoid of splinters.
Choosing the right sandpaper grit is paramount. Start with a coarser grit to remove any major imperfections and gradually move to finer grits for a polished finish. Remember, the higher the grit number, the smoother the finish. It’s like climbing a ladder; each step takes you closer to perfection.
Additional Tips for Perfect Circles
Even the most seasoned craftsmen can make minor mistakes. But fret not! Small imperfections can often be corrected with a bit of finesse and patience. For instance, if your circle isn’t as smooth as you’d like, consider using a file to even out the edges.
When it comes to larger circles, the challenge amplifies. A helpful technique is to divide the circle into sections and tackle each one individually. This way, you maintain control and ensure uniformity. And if you’re ever in doubt, the woodworking community on Reddit offers a plethora of tips and tricks.
Caring for Your Hand Tools
Craftsmanship isn’t just about the project at hand; it’s also about respecting and caring for the tools that make it possible. After all, well-maintained tools not only perform better but also last longer.
Cleaning your tools after each use is essential. Remove any wood residues and wipe them down with a dry cloth. For metal parts, consider using a bit of oil to prevent rusting. When storing, ensure they’re in a dry place, preferably in a toolbox or a designated drawer.
Ensuring the longevity and performance of your hand tools is an investment in your craft. And while we’re on the topic of tools, if you’re looking to expand your toolkit, this guide on The Basics on Multi-Bit Screwdriver is a must-read.
Frequently Asked Questions
How can I cut a circle in wood without using power tools?
The very first step is to mark the circle accurately using tools like a compass. Then, you can use hand tools such as chisels, coping saws, or even the string and nail method to cut the circle out.
Is it more challenging to cut circles without power tools?
While it might require more patience and technique, many artisans find the process more rewarding and precise without power tools.
What tools are essential for this task?
A compass, pencil, chisel, coping saw, and sandpaper are some of the basic tools you’d need.
How long does it typically take to cut a circle by hand?
The time can vary based on the wood’s thickness and your expertise, but on average, it might take 30 minutes to an hour.
Are there any safety precautions to consider?
Absolutely. Always work on a stable surface, keep your tools sharp for better control, and wear safety goggles to protect your eyes from wood splinters.
Can I achieve a smooth finish without power tools?
Yes, with careful sanding using the right grit sandpaper, you can achieve a smooth finish even without power tools.
Conclusion
Mastering the art of How To Cut A Circle In Wood Without Power Tools is not just about the final product but also about the journey. It’s a nod to traditional craftsmanship, a testament to patience, and a showcase of skill. As you embark on this woodworking adventure, remember that every circle you cut is a reflection of your dedication to the craft. So, the next time you admire a piece of woodwork, think of the hands that shaped it.
Thank you for reading!